In the world of craftsmanship, few things blend tradition and technology as beautifully as leather laser engraving. This technique transforms a timeless material into a canvas for endless creativity. Imagine a classic leather wallet, no longer just a functional item, but a personalized keepsake bearing a loved one’s initials. Picture a corporate gift—a high-quality journal—etched with a company logo so precise, it speaks volumes about the brand’s attention to detail. This is the power of laser engraving. It’s a game-changer for everyone, from small businesses creating unique product lines to hobbyists adding a professional touch to their creations.
Leather laser engraving is a non-contact process that uses a focused beam of light to permanently mark or cut leather. The best laser for this is a CO2 laser, as its wavelength is perfectly absorbed by organic materials. This creates a clean, precise, and high-contrast design by vaporizing the surface. Proper settings are crucial to avoid burning and achieve professional results on different types of leather, from full-grain to vegetable-tanned.
But where do you start? The world of lasers can seem complex, with talk of CO2, diodes, power settings, and material compatibility. It’s easy to feel overwhelmed. Misconceptions are common—that any laser can handle any leather, or that achieving a clean result is nearly impossible without burning the material. The truth is, with the right knowledge, laser engraving is an accessible and incredibly rewarding skill. This guide is designed to be your definitive resource, cutting through the noise to give you clear, actionable advice. We’ll explore everything from the science behind the technology to a step-by-step guide for getting that perfect finish. Ready to unlock the potential of leather? Let’s begin.
The Basics of Laser Engraving Technology
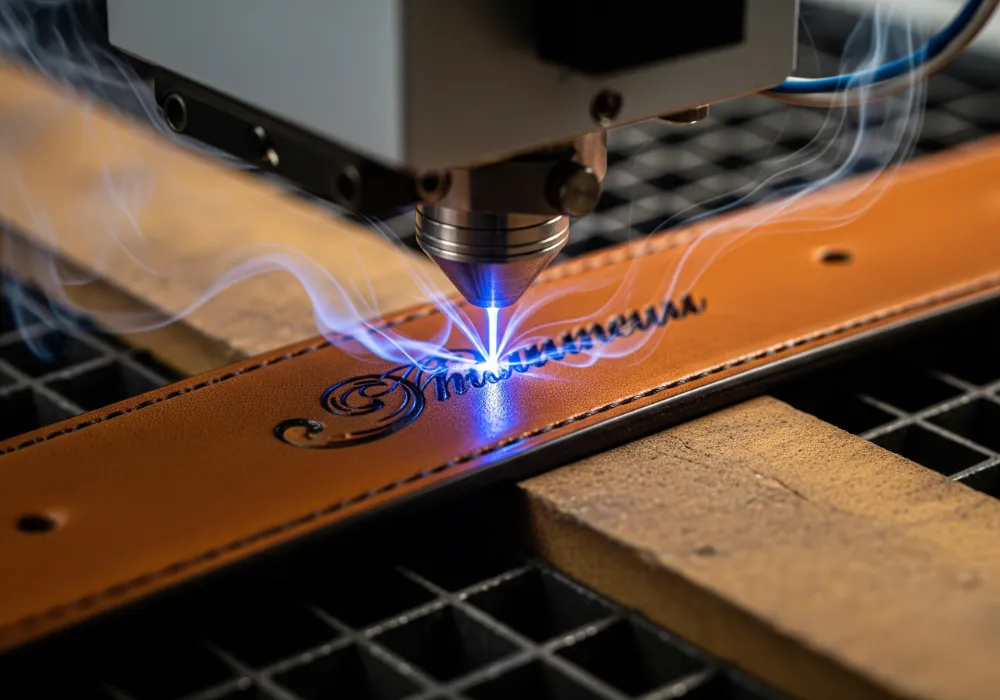
Laser engraving on leather works by using a highly focused beam of light to permanently alter the material’s surface. Think of it as a computer-controlled magnifying glass, but far more precise. The laser’s energy is absorbed by the leather, causing the surface to vaporize almost instantly. This process, known as ablation, removes a tiny layer of material, creating a visible, indented mark. The result is a crisp, clean design with a slightly darkened, almost branded appearance.
How the Magic Happens: Key Components
The entire process is a symphony of carefully controlled components working together. It starts with a digital design, which software translates into movement instructions for the laser head. Here are the key players:
- Laser Source: This is the heart of the machine. For leather, a CO2 laser is the industry standard. Its specific wavelength of light (10.6 micrometers) is perfectly absorbed by organic materials, making it highly efficient.
- Optics: A series of mirrors and a lens direct and focus the laser beam onto the leather with pinpoint accuracy.
- Motion System: This moves the laser head over the leather surface, precisely following the path laid out by your design file.
- Software: This is where you control the critical parameters—power, speed, and DPI (Dots Per Inch)—that determine the final look of your engraving.
The beauty of laser engraving on leather lies in its precision and permanence. Unlike printing or stamping, the design is physically etched into the material, meaning it won’t fade or rub off. This allows for incredibly intricate details that are perfectly repeatable every time.
Types of Leather Suitable for Laser Engraving
Not all leather is created equal, especially under the intense focus of a laser beam. The type of leather you choose will dramatically impact the final result. Lighter-colored leathers, especially vegetable-tanned varieties, are often favored because they produce a rich, dark, high-contrast burn. Darker or dyed leathers can also be engraved, but the effect may be more subtle. It’s a creative choice that depends on the look you want to achieve.
Natural vs. Synthetic: A Critical Distinction
Understanding the difference between real and man-made leather is the first step to success. Natural leathers engrave beautifully, while synthetics can be unpredictable and, in some cases, hazardous.
- Vegetable-Tanned Leather: This is the gold standard for laser engraving. It’s tanned using natural materials, and it engraves with a consistently dark, crisp contrast.
- Full-Grain and Top-Grain Leather: As high-quality natural leathers, they both engrave very well. The laser reveals the texture of the grain, adding depth to the design.
- Chrome-Tanned Leather: This leather is tanned with chromium salts, which can sometimes resist the laser. It often produces a less dark mark, but results can be excellent with the right settings.
- Faux Leather (PU): Polyurethane-based faux leather can be engraved, but it requires much lower power settings. Instead of vaporizing, it tends to melt, creating a debossed effect with less contrast.
- PVC-Based Leather: Never laser engrave PVC. When heated, it releases toxic chlorine gas, which is dangerous to your health and will corrode your laser machine.
Leather Compatibility Chart
| Leather Type | Engraveability Rating | Recommended Laser | Common Result |
|---|---|---|---|
| Vegetable-Tanned | Excellent | CO2 | Dark, high-contrast mark |
| Full-Grain / Top-Grain | Very Good | CO2 | Clean engraving with texture |
| Chrome-Tanned | Good | CO2 | Subtle, often lighter mark |
| Faux Leather (PU) | Fair | Low-Power CO2 / Diode | Melted, debossed effect |
| PVC Leather | Do Not Use | None | Releases Toxic Gas |
The golden rule of leather laser engraving is simple: when in doubt, test it out. Always use a small, scrap piece of the exact same leather to dial in your settings before engraving your final product. This simple step can save you from costly mistakes.
Choosing the Right Laser Type for Leather Engraving
While the concept of laser engraving is straightforward, the machine you use makes all the difference. The “best” laser for leather is determined by physics—specifically, the wavelength of the laser and how well it’s absorbed by the material. For an organic material like leather, one type of laser stands out as the clear winner, while others are less effective or simply unsuitable.
CO2 Lasers: The Professional’s Choice
CO2 lasers are the undisputed champions of leather engraving. They operate at a wavelength of 10.6 micrometers (10,600nm), which is in the far-infrared spectrum. This wavelength is perfectly absorbed by organic materials like leather, wood, and acrylics. This excellent absorption means the laser’s energy is used efficiently to vaporize the material, resulting in a clean, sharp engraving with minimal heat damage to the surrounding area. They are versatile, precise, and powerful enough for both delicate surface marking and deep, clean cuts.
- Pros: High-quality engraving, fast, versatile for cutting and marking, works on almost all leather types.
- Cons: Higher initial cost, larger machine footprint.
- Best For: Professionals, small businesses, and serious hobbyists who demand top-tier results.
Diode Lasers: The Hobbyist’s Starting Point
Diode lasers are popular in the entry-level market due to their affordability and compact size. They operate in the visible light spectrum (typically around 450nm). While they can mark leather, their wavelength isn’t absorbed as efficiently as a CO2 laser’s. This means they often require slower speeds or higher power to make a mark, which can sometimes lead to more of a “charred” or “branded” look rather than a clean vaporization. They are a great way to start, but they lack the speed and power for production work.
- Pros: Affordable, compact, easy to set up.
- Cons: Slower, less powerful, can produce a less clean result, struggles with cutting thicker leather.
- Best For: Beginners and hobbyists on a tight budget.
Fiber and UV Lasers: Niche and Unsuitable
Fiber Lasers are designed primarily for marking metals. Their wavelength (around 1,064nm) is reflected by most organic materials, making them very inefficient for engraving leather. They tend to scorch the surface rather than cleanly vaporizing it. UV Lasers are “cold” lasers that mark material with minimal heat, which is excellent for delicate plastics but often too subtle for the rich marking desired on leather. For leatherwork, it’s best to stick with CO2 or Diode.
Laser Showdown: Which is Right for You?
| Laser Type | Leather Suitability | Best Use Case | Typical Cost |
|---|---|---|---|
| CO2 Laser | Excellent (9/10) | Professional Engraving & Cutting | $1,000 – $5,000+ |
| Diode Laser | Good (6/10) | Hobbyist Surface Marking | $200 – $1,000 |
| Fiber Laser | Poor (1/10) | Not Recommended (for Metal) | $2,500+ |
Step-by-Step Guide to Laser Engraving Leather
Achieving a perfect laser engraving on leather isn’t about luck; it’s about following a methodical process. From preparing your design and material to dialing in the right settings and finishing the piece, each step is crucial. This guide will walk you through the entire workflow, helping you avoid common pitfalls and produce stunning, professional-quality results every time.

Step 1: Preparation is Key
Before the laser even turns on, your success is determined by your prep work. A clean material and a well-designed file are non-negotiable.
- Select and Clean Your Leather: Choose the right piece of leather for your project. Wipe the surface gently with a slightly damp cloth to remove any dust or oils, then let it dry completely.
- Design Your Artwork: Create your design in software like Adobe Illustrator, Inkscape, or LightBurn. For crisp lines and text, use vector graphics. For photos or shaded designs, use high-resolution raster images (at least 300 DPI).
- Apply Masking Tape (Optional but Recommended): Cover the engraving area with a layer of wide masking tape. This is a pro-tip that dramatically reduces smoke staining and charring on the surface, resulting in a much cleaner finish. The laser will cut through the tape and engrave the leather underneath.
Step 2: Machine Setup and Testing
This is the most critical stage. Never engrave your final piece without first running a test on a scrap of the exact same material. A “test grid” with different power and speed settings is the best way to find the perfect combination for your specific leather.
- Secure the Leather: Place your leather on the laser bed. Make sure it is completely flat. Use weights or honeycomb pins if necessary to prevent any curling.
- Set the Focus: Proper focus is essential for a sharp engraving. Use your machine’s focusing tool to set the correct distance between the laser nozzle and the leather surface.
- Dial in Your Settings: Based on your test grid, input the optimal settings for power, speed, and DPI into the software. A good starting point for a 50W CO2 laser on vegetable-tanned leather might be 30% power at 300 mm/s.
Step 3: The Engraving Process
With everything prepared, it’s time to bring your design to life.
- Frame Your Design: Use your laser’s “frame” or “preview” function. This will trace the outline of your design without firing the laser, allowing you to confirm its position on the leather.
- Start the Engraving: With proper ventilation running, start the job. Stay near the machine to monitor the process, especially for any potential flare-ups (which air assist helps prevent).
- Use Multiple Passes for Depth: If you want a deeper engraving, it’s better to run two or three passes at a lower power setting rather than one slow pass at high power. This prevents excessive burning and results in a cleaner mark.
Step 4: Post-Processing and Finishing
The job isn’t done when the laser stops. A little cleanup and care will make your design pop.
-
- Clean the Surface: If you used masking tape, carefully peel it off. Use a soft brush or a cloth with a bit of rubbing alcohol to gently wipe away any soot or residue from the engraved area.
- Condition the Leather: Laser engraving can dry out the leather. Apply a quality leather conditioner or oil to the entire piece to restore moisture and protect the surface. This also often darkens the engraving slightly, enhancing its contrast.
</em 500 characters
Advanced Tips and Techniques for Professional Results
Once you’ve mastered the basics, you can start experimenting with advanced techniques to elevate your leather projects from good to exceptional. These tips focus on optimizing your designs, achieving unique effects, and scaling up your production for business purposes. Moving beyond a simple burn, these methods give you greater creative control over the final look and feel of your work.
Optimizing Your Designs for the Laser
Not every design translates perfectly to leather. Thinking like a laser from the start can make a huge difference.
-
-
- Mind the Gaps: For very thin fonts or intricate lines, the heat from the laser can cause the areas in between to burn away. Thicken up delicate parts of your design or choose bolder fonts.
- Use Software Tricks: In programs like LightBurn, you can use features like “Offset” to create clean borders around your designs or “Hatching” (cross-hatching) to create interesting fill textures instead of a solid burn.
- High-Contrast is Your Friend: Designs with clear positive and negative space tend to look best. Grayscale photos can be engraved, but they require careful dithering in software to translate the shades into a pattern the laser can etch.
-
Achieving Special Effects
The look of your engraving isn’t just one style. By manipulating your settings, you can achieve a range of finishes, from a subtle, light mark to a deep, dark brand.
-
-
- For a Deeper, Darker Burn: Slow down the speed and slightly increase the power. This gives the laser more time to dwell on the material, resulting in a deeper, more carbonized mark. Be careful not to go too slow, as this can cause excessive charring.
- Creating 3D Depth: You can create a bas-relief effect by using multiple grayscale layers in your design. Set your laser to engrave different power levels based on the shade of gray. Darker grays get more power (deeper engraving), while lighter grays get less.
- Color Filling: After engraving, you can apply leather dyes or acrylic paints into the etched areas to add a pop of color. The engraved recesses hold the color neatly, creating a sharp, professional look.
-
Scaling Up for Business
If you’re moving from a hobby to a business, efficiency is key.
-
-
- Create a Jig: For batch-engraving items like wallets or coasters, create a template (a “jig”) out of cardboard or plywood with cutouts for each item. This allows you to place multiple items in the exact same spot every time, so you can run a single file for the whole batch.
- Use Rotary Attachments: To engrave on curved or cylindrical leather items like flasks or bracelets, a rotary attachment is essential. This tool rotates the object as the laser engraves, ensuring a clean, non-distorted result.
-
Creative Project Ideas and Applications for Leather Laser Engraving
Now that you understand the technology and techniques, what can you actually create? Leather laser engraving opens up a world of possibilities for personalization, branding, and artistry. Whether you’re a beginner looking for a simple first project or a business seeking to offer unique products, there’s an application to match your skill level and ambition.
Beginner-Friendly Projects
These projects are perfect for getting comfortable with your laser and require minimal material and design complexity.
-
-
- Personalized Keychains: A small, simple project perfect for testing settings. Engrave initials, a name, or a simple logo.
- Custom Coasters: A great way to practice with patterns or text. A set of four with a family name or a favorite quote makes a wonderful gift.
- Wallet Monogramming: Adding initials to a pre-made leather wallet is a classic, high-value personalization that’s easy to execute.
- Leather Patches: Engrave and cut custom patches for hats, jackets, and bags.
-
Advanced and Commercial Applications
Ready to tackle something more complex? These ideas are perfect for creating standout products for a business or a truly special personal item.
-
-
- Intricately Engraved Bags: Cover the entire surface of a handbag or backpack with a detailed pattern like a floral motif, a geometric design, or even a city map.
- Custom Journal Covers: Engrave a favorite quote, a complex logo, or a piece of line art onto the cover of a leather-bound journal.
- Branded Corporate Gifts: Elevate corporate swag with laser-engraved portfolios, mousepads, and valet trays.
- Wedding Favors: Create personalized luggage tags or drink holders for guests.
- Tech Integrations: Engrave a QR code on a business card holder that links to a portfolio, or embed an NFC chip under an engraved logo on a keychain.
-
Think beyond simple text. Use your laser to create textures, patterns, and images that turn a simple piece of leather into a work of art. The only limit is your imagination.
Safety, Maintenance, and Cost Considerations
Owning and operating a laser engraver is a rewarding experience, but it comes with responsibilities. Prioritizing safety, performing regular maintenance, and understanding the costs are crucial for long-term success. This isn’t just about protecting your investment; it’s about protecting yourself and ensuring your machine runs reliably for years to come.

Safety First: Non-Negotiable Precautions
A laser is a powerful tool and must be treated with respect.
-
-
- Ventilation is Essential: The smoke produced from engraving leather is harmful. You must have a proper exhaust system that vents fumes to the outside. Never run your laser in an unventilated space.
- Eye Protection: Never look directly at the laser beam. Ensure your machine has a proper safety enclosure made from laser-rated material. If it doesn’t, wear certified safety glasses that are rated for your laser’s specific wavelength.
- Fire Risk: Leather is flammable. Never leave your laser unattended while it is operating. Keep a fire extinguisher (CO2 type is recommended) within easy reach.
-
Machine Maintenance for Longevity
A clean machine is a happy machine. Regular maintenance is key to consistent results.
-
-
- Clean Your Optics: The mirrors and lens that direct the laser beam must be cleaned regularly (daily or weekly depending on use). A dirty lens will significantly reduce your laser’s power and can even crack.
- Remove Debris: Keep the inside of your laser free of leather dust and residue. This buildup can be a fire hazard and can interfere with the machine’s mechanics.
- Check Alignment: Periodically check your laser beam’s alignment to ensure it’s hitting the center of the lens for maximum efficiency.
-
Understanding the Costs
Investing in a laser is more than just the upfront cost of the machine. Consider the ongoing expenses and the potential return on investment for your projects or business.
-
-
- Entry-Level (Hobbyist): A good quality diode laser can range from $200 to $1,000.
- Mid-Range (Small Business): An entry-level CO2 laser often costs between $1,000 and $5,000.
- Ongoing Costs: Factor in the cost of materials (leather can be $5-$20+ per square foot), software, and potential maintenance like replacing the laser tube every few years.
-
Frequently Asked Questions (FAQs)
What is the best laser type for engraving leather?
A CO2 laser is unequivocally the best choice. Its infrared wavelength is perfectly absorbed by organic materials like leather, resulting in a clean, sharp, and efficient engraving. While diode lasers can work, they are slower and less powerful, making them better suited for hobbyists than professionals.
Can you laser engrave faux or synthetic leather?
Yes, but with extreme caution. PU (polyurethane) leather can be engraved with low power settings, but it tends to melt rather than vaporize. You must NEVER engrave PVC-based leather, as it releases toxic chlorine gas that is dangerous to your health and will destroy your machine.
How do you prepare leather for laser engraving?
First, ensure the leather is clean and completely flat on the laser bed. For the cleanest results, apply a layer of wide masking tape over the surface. This prevents smoke and soot from staining the area around your design, which you can simply peel off after the job is done.
What are the optimal settings for laser engraving leather?
There is no single “perfect” setting; it always depends on your specific leather and machine wattage. However, a great starting point for a 50W CO2 laser on vegetable-tanned leather is around 25-30% power at a speed of 300 mm/s. Always perform a test on a scrap piece first to fine-tune your settings.
How do you clean leather after laser engraving?
After removing the masking tape, there might be a small amount of residue left. Gently wipe the engraved area with a soft cloth and a small amount of rubbing alcohol. Once clean and dry, apply a quality leather conditioner to restore moisture and protect the piece.
Can laser engraving damage leather?
Yes, if done improperly. Using too much power or moving too slowly can burn the leather, making it brittle and weak. This is why testing your settings is so important. When done correctly, however, laser engraving is a safe and permanent way to mark leather without compromising its integrity.
Conclusion
Leather laser engraving is a remarkable fusion of age-old craftsmanship and modern technology. As we’ve seen, the path to achieving stunning results is not about secret formulas, but about understanding a few key principles. The journey begins with choosing the right tools—with the CO2 laser reigning supreme for its versatility and precision. It continues with selecting the perfect canvas, as different types of leather each tell a unique story under the beam. Finally, mastery is found in the details: the careful preparation of your design, the methodical testing of your settings, and the final touches that protect and enhance your work.
The potential is truly limitless. From a simple monogram on a wallet to an intricate mural on a handbag, laser engraving empowers you to create items that are not just made, but are deeply personal and meaningful. It offers a powerful way for businesses to elevate their brand and for artisans to push the boundaries of their creativity.
Are you ready to bring your custom leather designs to life with unparalleled precision and quality? The world of laser engraving can be complex and requires significant investment in equipment and expertise. Let us handle the technology so you can focus on the design. At Hoplok Leather, we combine over two decades of traditional craftsmanship with advanced, in-house laser engraving capabilities. Contact us today for a free consultation and discover how we can turn your vision into a beautifully finished product, delivered with speed and reliability.